Quick and Easy Steps to Upgrade Your Windows 11 ARM VM in Parallels from 20.x to 24H2!
2024-10-14
Author: Daniel
Step 1: Create a New Windows 11 VM
Start by creating a new Windows 11 virtual machine (VM) in Parallels. This action will automatically download the latest ISO file for Windows 11 24H2, which will be saved in your Downloads directory. This new file is essential for the upgrade process.
Step 2: Remove the New VM
Once the new VM has been successfully created, you can remove it from your Parallels environment. Don’t worry—you’ve already downloaded the necessary ISO for the upgrade.
Step 3: Alter the Existing VM
Locate the existing VM that you wish to upgrade. Go to Settings, then navigate to the Hardware tab, and select CD-ROM. Here, you will need to map the new ISO image that you just downloaded to your existing VM.
Step 4: Create a Backup Snapshot
Before starting the upgrade, it's crucial to create a snapshot of your current VM. This serves as a safety measure, allowing you to restore your system if anything goes wrong during the upgrade—better safe than sorry!
Step 5: Begin the Upgrade
Launch your existing VM and start the setup from the new CD. The upgrade process will initiate, involving a few reboots along the way. Patience is key here; the process will take some time but rest assured, you will be rewarded with the latest features of 24H2!
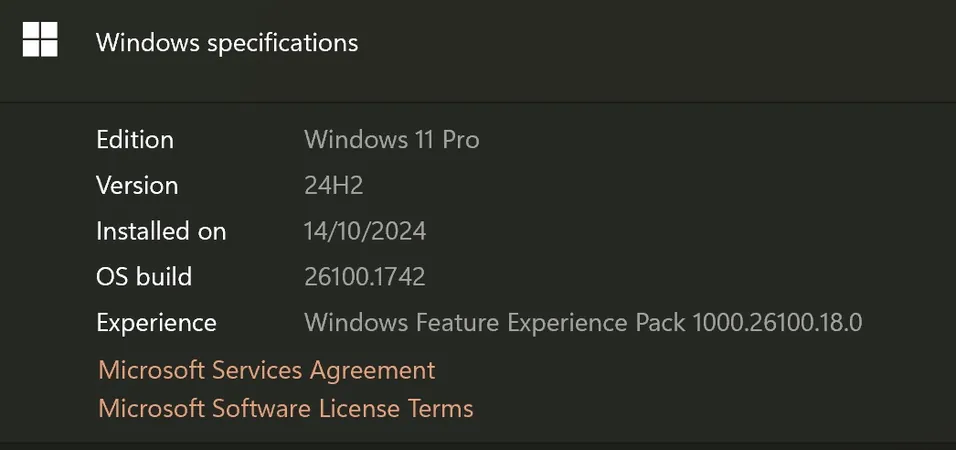
Step 6: Confirm the Upgrade
After the installation is complete, verify that everything is running smoothly. Check your system settings for the updated version to ensure the upgrade was successful.
Step 7: Clean up and Optimize
Once you're satisfied with the upgrade and everything is functioning as it should, you can remove the snapshot you created earlier. This will not only save space on your VM but also enhance its performance.
Final Thoughts:
Congrats! You have successfully upgraded your Windows 11 ARM VM in Parallels to the latest 24H2 version. Enjoy the enhanced performance, improved security features, and new functionalities that come with this update!
Stay tuned for more tips and tricks to make the most out of your virtual computing experience!


 Brasil (PT)
 Canada (EN)
 Chile (ES)
 España (ES)
 France (FR)
 Hong Kong (EN)
 Italia (IT)
 日本 (JA)
 Magyarország (HU)
 Norge (NO)
 Polska (PL)
 Schweiz (DE)
 Singapore (EN)
 Sverige (SV)
 Suomi (FI)
 Türkiye (TR)